Showing posts with label Crafts. Show all posts

Saturday, December 19, 2009

Christmas crafting with the kiddos


I am always in search of something useful the girls can make that looks nice.  Well, I found a couple of keepers.  We started both of these projects 30 minutes before our neighborhood Christmas party.  The girls made them for an ornament contest.  Here's what we did....

Ms. Priss stitched this half eaten gingerbread man....


And Lil' Bit modeled the s'mores snowman out of Model Magic.  (The blog, which I link to below suggested making it out of Sculpey but we like Model Magic in this household.)


You can find the gingerbread felt ornament here and the s'mores snowman here

By the way the snowman s'more won first place.  She got a $25 gift card to Barnes and Noble!  Woohoo...more books!!!

Monday, December 7, 2009

Clippies & whirly-gigs

I promised I would post some of my clipboards and a brief tut on how to make them.

First it is not necessary but preferred to prime the metal clip on the board.  You can get by without doing this step but the paint may chip off more easily.  I have had reasonable success with using Gesso instead of the spray-on Krylon (or the like) primer.  Then you will paint the wooden part of the board with regular craft paint.  Lots of times I will let the girls do this step.  They love it and they really can't mess anything up.  It is a win-win-win situation.


In case you're one of THOSE (and I'm talkin' to you Coll) that has to know specifics...it looks like here I used Winter Blue for the board and Light Buttermilk for the clip.

 
Oh, I almost forgot...before you start take a twist-tie or florist wire or any kind of wire and twist it to hold open the clip.  I find a set of pliers helps me.  It allows you to get underneath the clip to paint the board and also doubles as a handy-dandy hanger for drying purposes...  Which is especially nice if you're making a gift for an event that you were already supposed to have left the house to attend.  Think I would do something like that?!?


Next is the fun part.  Invest in a lovely set of alphabet foam stamps.  You won't regret this purchase.  Any other classic shapes (like flourishes, etc..) you will find yourself using over and over again too.  These are Making Memories (Misunderstood font).


I used this flourish in a powder room in our first house.  It has served me well.


I like to vary my stamp sizes and colors for interest.


Don't forget to grunge the edges (just dry brush with paint, ink, or both)  See the difference in the before and after...

Before grunge


After grunge
(don't forget to grunge the clip too)


And go here if you want to tie the perfect bow.


Then you're done. (Don't forget to take off the twist-tie/wire holding the clip open.)


The possibilities are endless.  They really do make good gifts for kids and adults alike.  There is something about the wooden clipboard that kids especially LOVE though.  I think it makes them feel grown up or something.


Now, wanna cute quick project for the kiddos?  I'm thinking this would be cute done in Christmas colors of your choice and used as a garland.  You could even deliberately space them so that you didn't have $400 caught up in felt.

You are going to need several pieces of felt about 4x6" (we cut the precut 4/$1 felt into 4 pieces). 

Place 2 different colors of felt on top of each other. 

Glue the 2 pieces together at one short edge and let it dry. 

Roll it up and glue to hold (think sushi).  We used Aileen's Tacky Glue.  Let that dry. 

Cut them into about 1" rounds, let the kiddos string them (with a needle).  We did find that it was kind of tough to get through all that dried glue with a needle so I had to help them a little with that part.


Now get crafting...Christmas will be here before you know it!

Monday, October 26, 2009

Make your own playing card holders


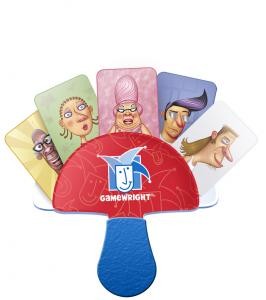
Have you ever seen one of these?


In case you've never seen one, this is a playing card holder.  A very ingenious device!  However just a little too rich for my blood.  If you've been reading my blog for long you will notice a recurring theme.  I AM CHEAP.  Enter exhibit A, my home-made playing card holder. 


Wanna know how?  Here goes... Gather 2 lids (one larger than the other) from old yogurt, cream cheese, sour cream, or butter containers.


You're also going to need a punch set (or something else like an ice-pick that you can make a small hole with).  Like how I store my punch set?  Before you go judging me...I made this a few years ago in attempt to win a contest for scrapbooking storage supply solutions.  Because if you lure me with something free, I will spend inordinate amounts of time and energy in that endeavor.  I actually won the contest (not with this box, though)...and got just what I needed:  more scrapbooking supplies.  This is one of those boxes from Costco that I just recovered with some shabby chic scrapbooking paper, tied some riboon around, and hot glued a silk flower on top.


Back to our regularly scheduled programming....Punch holes in the centers of both of the lids.  There is usually a little raised bump which is helpful in centering.


You're also going to need a brad, decorative is always nice.  See my collection of "pink" scrapping supplies?  Now are you understanding the tongue in cheek above comment about needing more scrapping supplies?


 Place the lids top sides facing each other and attach with a brad.


Give the girls a sheet of stickers and let them have at decorating.  I helped them place a large butterfly to completely cover the back side of the brad.


Oh yes, I just have to mention.  This kind of thing really bugs me.
 

So, if you don't already have some go today and purchase you some 100% acetone.  Don't settle for any of that watered down Sally Hanson junk...get the full monty.


This stuff will take just about ANYTHING off.  I have removed so many labels and repurposed many things thanks to a handy bottle of 100% acetone.  Plus it is REALLY good at getting dark/bright fingernail polish off.


See that?  Like magic!

And there you have it 2 pretty, inexpensive playing card holders...

Front side


Back side


We have been playing a lot of crazy eights in the evenings and I've been wanting to do something like this to help them hold their cards.  Anyway, today Lil' Bit's Saxon math book, of all places, suggested playing a game called "Make Ten".  You play by dealing 7 cards to each player.  You lay out 0, 1, 2, 3, 4, and 5 in a circle and each player tries to make a sum of 10 by laying a card on top of another.  So you wold place an 8 over a 2 or a 6 over a 4, etc..  If you don't have any cards to play you have to take 2 cards from the stack.  The first person to play all of his/her cards is the winner.  It is actually a pretty fun game and it helps retention of those 10 facts.


My girls love playing cards with us, it is fun for all, and I think it is a great way for our family to spend time together.  Go fish!

Saturday, September 19, 2009

Weeks 3&4 Jamestown Settlement

It seems like ages since I have posted homeschool stuff. I guess we have been too busy with it all but we have slowed down a bit and taken 3 weeks instead of 2 for both our Jamestown and Indian studies. Part of the reason is that we finished Squanto early and I decided to read aloud Blood on the River. I can't say enough good things about this book. At first I was a little apprehensive and couldn't find many reviews online to find out if it was appropriate for my girls. I decided just to go ahead and read it and it is a great read! There are parts that get a little (unnecessarily) graphic. But all-in-all it is a wonderfully written living history book. The characters John Smith, Reverend Hunt, and Samuel Collier (the main character) all teach some great character values - channel your anger, you don't work you don't eat, act out of love not fear, and rely on others/have many legs. Although it is not a blatant Christian work it does have positive Christian elements and influence.

We are even thinking about going to Jamestown for a couple of days. They have homeschool days going on right now. Even if you can't attend I recommend virtually visiting their site. There's lots of resources there.

WWJD Bracelets


Jesus the Light of the World Candle

Paint with Glue and attach the "Jesus the Light of the World" label
Sprinkle with glitter
Voila

Enjoy!

We've been burning this at night for dinner. Simply wonderful.

Scripture memory verse - John 8:12


I made Ms. Priss' a little more difficult by cutting apart every word. For Lil Bit's I printed what I could fit on a 3x5 card and let her piece that together. By the end of the week they could say it and put it together no problem without looking at the white board with the written verse. So, as a little treat we decided to hone our sewing skills and make some room decorations.

Punch holes

String together with some of Mom's ribbon stash - if you've read much of my blog you know I have a little bit to spare!

There you have it!

Making Wigwams & Teepees
tip #1: Use Tacky Glue and clips


Tip #2: label the inside of your wigwam with two 1's, two 2's, two 3's, and two 4's directly across/opposite from each other to help the kids know where to place their strips.

Tip #3: Secure the strips around the ring with paper clips

Tip #4: Thin the glue with a little water


Could this be Powhatan Territories? I got this idea from Erica. I just love her blog!


We're moving on to the Pilgrims next. I have LOTS of books for that. I'm thinking we'll be through with this curriculum in about 4 years.