
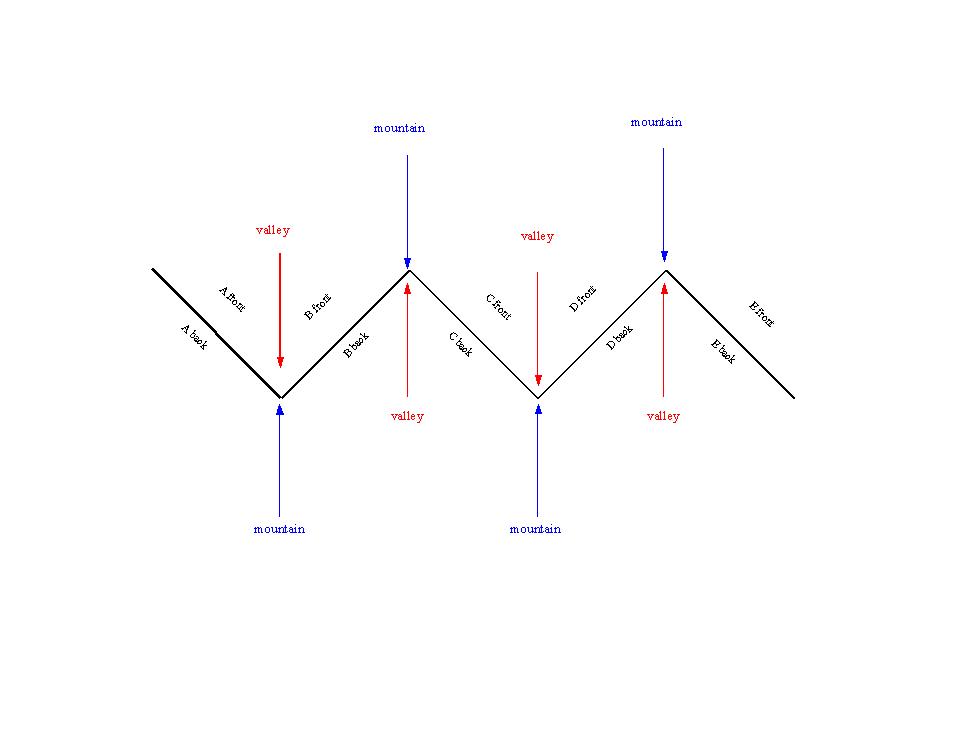
Below is a visual hopefully further illustrating my point in the video.
One thing that I didn't mention in the video (there were a lot of mistakes and slips of tongue...sheet of tape?!? I have new respect for people who are on DIY television shows..aaaaanyyyywaaaayyy....)
I used only 1 piece of tape per fold (in the middle of each index card) on the video. If you're taping a larger (8.5x11") sheet of cardstock you obviously want to use 2 or 3 pieces of tape (top, bottom and possibly middle) per fold. If you want to tape in 3 spots you may want to tape it at just the top and bottom, draw your line, and then go back and add that middle piece of tape because even a Sharpie or Magic Marker is not going to want to mark over a piece of tape.
Since we're on the topic of timelines you also may be interested in my book of centuries that I created. I have not really used it much with my girls since it is a little more abstract but plan to use it eventually when they're a little older and no longer need concrete manipulatives illustrating the consecutive dates in that of a real timeline. You will need to print this front and back and be warned it is A LOT of pages.


10 comments:
Thanks for sharing such a simple fold that makes a big difference.
Hey... You should do more of those videos. I think my only problem last year was I used too much tape and it got stiff. Anyhow... I had an idea for the timeline. It needs a pretty house. You could doctor up a small 3 ring binder w/world map decoupage or old traveling scrapbook papers (the possibilities are endless). One the very first timeline sheet just punch 3 holes and place it in the binder. When you are ready to use it, just take it down from the shelf, admire your work then open it and slowly unfold the timeline. Then just do the reverse when done. Can you see what I'm trying to say - does it make any sense at all?? Lisa Smiley
Lisa,
Yes, I think I am visualizing what you're saying. How would you get the other sheets to fold up without hitting the ring? Maybe just tape a small strip to the left end just to extend it so it will fold up??? I tried to email you but I don't have your email address on this computer and my laptop is down and out.
-g
Yes, a strip to the left. You could even do it in a patterned paper - make it look like a binding or something. You could even make Page 1 a title page or decorate it or something along those lines. The timeline then would fold up and under Page 1. I'll email you my email address. Lisa
This is such a cool way to fold.
Thanks! I plan to do my time line this way. We live in a rental and I don't want to hang it on the walls.
I like Lisa's idea to store it too!
Lisa's idea of a binder is a good one. You could use a 12x12 sheet of scrapbook paper or cardstock to make the last page, cutting it down to 11.5 x 9 so it is a half inch wider than the other sheets. Then punch your three holes in the half inch edge that sticks out.
I found this post because I am planning to have my daughter make a timeline for her science history chapter to help her remember all the scientists, their contributions, and where they fall in time. I googled and found Ginger snap shots, top of the list and just what I needed. Thanks!! :)
~~Rhonda
Rhonda, I'm so glad you found what you were looking for. That is so funny you mention that about science. I have a new blog post "brewing" about my new-found interest in teaching science. What a great idea to integrate science with history. Nothing short of genius!
Ginger, here's the finished product. Worked great! Thanks for the inspiration! ~~Rhonda :)
http://christmasnotebook.com/2010/09/17/science-timeline/
I love this! I was hoping google could help me find something like this for my daughter's History Girls Club.
Since we will only be covering about 150 years of history in our club this year, I think we will make them on index cards. Then I can make a pocket envelope for them to sotre them in their notebooks.
Thank you!
Post a Comment