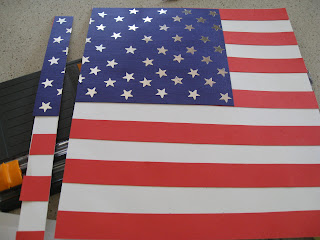
Notice I did make a concession and leave the back plain. Hmphh!
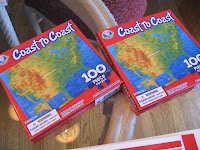
 I found this little gem in Target's Dollar section.

OK...you want directions and a few helpful hints? Here goes:
I advise precutting everything before your lovely little darlings come in to "help". I tried it first with Lil Bit helping and it went much more smoothly with Ms. Priss when I had everything already cut and marked. Here are the diminsions I used for a standard 1" binder
(I used 12x12 scrapbooking cardstock)
Cut 1 white piece of cardstock 11.25" (h) x 10.75" (w)
Cut 7 red strips 13/16"(h) x 10.75" (w) ---I will detail another way to do this below
Cut 1 blue piece of cardstock 6" (h) x 7.25" (w)
You will need some kind of stars. We used stickers but if you have a star punch you could punch them out of white cardstock and glue them on
These dimensions should work fine for most notebooks. But in case you have an odd sized notebook or you simply want to use this technique later here's a neat little trick. This is something my Dad, a draftsman, showed us years ago. Take the white and red pcs of cardstock and cut them to fit the inside front opening of your notebook and add 1" to the width (or whatever the width of the spine). Now, because the flag has 13 stripes, you will need a 13" or longer ruler to do this part. Simply place your ruler on the diagonal with the zero mark at the bottom of your page and the 13" mark at the top of the page (in our case remember "top to bottom" or the "height" is the 11.25" measurement).

Now, make marks at each 1" increment:


Voila! You will have 13 evenly space lines. For the white sheet, I flipped the ruler (think an imaginary X) so that there were 2 marks for each row. For the red sheet, one mark should do. Simply use a paper trimmer and cut at the markings.
 It doesn't have to be perfect. We're not building a rocket. It just seems like it.
Then glue the red strips onto the white sheet. (Remember a red stripe is at the top and bottom of the US Flag).

I know you can't SEE the 2 marks but this is where it is nice to have the 2 marks on the white sheet so that the lines are nice and even...


Now, for the blue part. After some experience I found that it was best to pencil where each star goes and then have them put the stickers down. (Remember there are 6,5,6,5,6,5,6,5,6 rows of stars). Start by locating the 4 corners:
 Then put a star (or mark) in between those like this:
 Then put a star in between those and that will give you your "6-star rows". You're going to have to eyeball the horizontal spacing though.
See the little pencil marks for all the 6-star rows? I just had her fill-in the remaining ones in the "windows". I fear I am making this sound far more difficult than it actually was.

After they glue the blue piece onto the top left corner, cut away a 1" strip (for the spine)

Slip it into your notebook and you're done! Whew!
Now, if you haven't already I highly recommend you start thinking about some 100-day activities. It really helps reinforce number sense. If you've read my blog for long you'll remember I posted about it this past spring. One of our daily calendar activities involves putting in a puzzle piece for every day (until the 100th day). Well, low and behold, I found 100 piece USA map puzzles in the $ section of Tar-jay.

Here's how to do it. Put the puzzle together on a cookie sheet (keep these for the kids to put their puzzles together on when you start your school days - if you've already started just tell your kids what you're going to start doing. I'm sure they'd be thrilled to start by putting in 10 or 15 days worth of pieces at one time).

Invert the puzzle by nesting the puzzle between 2 cookie sheets
 Now, label the pieces from 1 to 100. Skip around some so it's not always so predictable where each piece will go but you need to always label next to a piece that is already labeled.


Lastly, take it back apart and put the pieces in 5 different ziplocs labeled 1-20, 21-40... so that the pieces are easier to find.

Last year I kept the puzzle design a surprise from my girls but since I'm sure they can figure out it is a map I probably won't do that this year.


4 comments:
I just love these notebooks!!! I hope you don't mind me copying this idea :) Of course, I'll share where the idea came from...thanks so much for sharing your creativity.
Have a blessed weekend,
~Mrs.Cuddles
Did you find enough silver stars? I think I had a star punch. Did I give it to you? If you don't have it, I'll look for it.
Mom
Oh and I love the notebooks AND the puzzle.
These look like fun projects to incorporate, thanks! I found those puzzles at Target, too! Not sure my kids will want to wait to put it together until the 100th day, though. =) What ages are you kids?
Post a Comment